Showing posts with label DIY. Show all posts

7 DIY Kids’ Valentines Mailboxes

DIY Valentines Mailboxes
So, if you’re feeling like an over achiever and want to do something fun with your kids over the weekend… Why not help them make the coolest Valentine’s Day mailbox ever?  However, if you just send them to school with a shoebox, tissue box, cereal box, or paper bag then that’s okay, too.  I’m not going to tell, and we can just pretend you never even saw this post.

Follow my Valentine's Pinterest Board!

Because that’s the kind of mom I am.  I would totally be committed to doing one of these cool mailboxes and then BAM! It’d be Valentine’s Day and we’d be lucky if we even had Valentines ready to hand out at school.

However, if you miss the Valentine’s Day train then you can still make a cool mailbox for your home where you kiddo can receive their very own mail.  Studies show that exchanging letters with family members strengthens literacy skills and family ties!

DIY Kids’ Mailboxes

Robot Mailbox via Making of a Mom
Milk Container Penguin Mailbox via Dollar Store Crafts
Penguin-Valentine-Pail
Hot Air Balloon Mailbox via Making of a Mom
Glitter Coffee Can Mailbox via The Idea Box
Kitty Cat Mailbox via Pretty Plain Janes
Unicorn Mailbox via Artsy Fartsy Mama
Unicorn-Valentine-Box
Princess Castle Mailbox via Making of a Mom

Love it? Pin it!

DIY Kids Valentine Mailboxes

Easy Last Minute Kids’ Valentines

Easy-Quick-Kids-Valentines
Raise your hand if you’re a procrastinator? Oh.  You, too?!  They start putting Valentine’s Day decorations, candy, and cards out before they’ve even had time to clear out the Christmas decorations from the shelves. 

However, I’m that person who didn’t take her Christmas tree down until the middle (or endish) of January and not because I was still feeling the holiday spirit still, either.


I’m usually running around like a mad woman before any holiday where it might be somewhat expected for my kids to participate at school through food, gifts, etc.  I always feel like Valentine’s Day just creeps up on me, though one year I tried to super mom it and did an okay job making homemade fortune cookies.

So, if Valentine’s Day has snuck up on you, then here’s some easy kids’ Valentines you and your little one can whip up together without losing your mind.

Easy, Last Minute Valentines for Kids

Valentines Scratch Offs via Dollar Store Crafts
DIY-Valentine-Scratch-Cards
Crazy Straw Printable via Momma Lew
Minecraft Valentines via Atta Girl Says
Monkey Valentines via Beauty Through Imperfection
Ninja Valentines via Merry About Town
Ninja-Printable-Valentines-Cards-620x438
Owl Valentine’s Cards via A Spectacled Owl
Cute Animal Valentine’s Day Cards via Food Fun Family
Monster Jokes Valentines via Two Kids & a Coupon
Fortune Teller (Cootie Catcher) Valentines via Atta Girl Says
printable-valentine-cootie-catcher
Out of this World Valentines via The Joys of Boys
Monster Valentines via Food Fun Family
Monster-Valentine-Craft
Three Printable Valentine’s Cards via A Spectacled Owl
Valentine’s Day Puzzle Cards via Food Fun Family

Love it? Pin it!

easy last minute valentines

How to Paint Crisp Designs on Textured Walls

Paint Designs on Textured Wall
Today I'm sharing with you how to get crisp lines for designs/stencils on textured walls. All of the walls in my house are textured. The ones in these images are like a popcorn ceiling…except it’s my wall. None of my walls are just a little textured. They're all obnoxiously textured, of course, which is a real pain to paint.


So for everyone out there with a home that had previous owners who embraced the textured phase… Well, this one is for you.  Painting these walls can be a real pain in the butt.  Glad to be here to help!

Step 1. Tape

I advise getting good quality tape, first. Then tape off your design, your lines, or whatever it is you're taping.

Step 2. Caulk

To prevent running paint and leaks, etc., purchase a paintable silicone caulk and smooth a small amount over all paint edges.

Step 3. Paint Roller

Use a paint roller, not a paintbrush, to paint over your tape.

Step 4. Remove

Remove for crisp, beautiful lines/designs! See images below for examples of the difference these steps can make.

Love it? Pin it!

Crisp-Designs-on-Textured-Walls
Thanks to Creative Ramblings for inspiring me to try this!

4 Things You Need to Know Before Painting

Painting Tips
I was so excited to finally get the ball rolling on making our house truly ours. We'd lived in our home for about 18 months and the people who lived in the house before us picked some treacherous (and very dark) paint colors. The living room was the first room we ever painted in our home and I definitely learned a lot of lessons from that experience, which I’m sharing with you!

Remove the Trim

Any seasoned painter (or anyone who listens when their husband says we need to take off the trim) knows that you need to remove all the trim in the room before painting. Even if that trim is going to be painted the same color as either the base/primer color or the other color.

It's easier to paint it separately. Trust me! It can't be any more difficult than the way we did it. Plus, the wall under the trim will get painted properly this way, too.

So, if in the future, you want to update your trim (which I do) you won't have to worry about the possibility have needing to paint again. I'm still not sure why my husband listened to me when I told him we didn't need to take off the trim. I secretly think he was waiting to soak up that "I told you so" moment.
4 Things You Need to Know Before You Paint

Use the Wider Painter's Tape

We used the Duck Brand 1" Clean Release Painter's Tape. I actually bought a three pack from Wal Mart. The tape worked great! However, I should have known better than to think that the smaller tape would be enough to wholly protect everything.

Based on my experiences, you’re better off buying the wider tape! I'll definitely be using the 1" tape in the boys room for some detailing work I'll need to do. As far as protecting the ceiling and any trim/molding I can't remove, I'll be using the wider tape. I also plan on taping down a plastic sheet on the floor with the wide tape, which brings me to my next tip.

Protect the Floor and Do It Well

We had a tarp in our garage that was left by the previous inhabitants of this house. I was sure it'd be a great way to protect our wood floors during painting. However, I didn't tape it down or anything and it was really no help at all since it didn't cover the whole floor.

If there was only one person painting, that would be okay. However, typically there was my husband and me or my husband and a helper. So, paint drips happened. Oh, and my cat decided to jump onto a freshly painted window sill and then prance across the living room floor. Probably some new age way of marking his territory, I guess.

Anyway, next time I want to buy plastic sheeting or a drop cloth and secure it to the floor. However, eHow has some other suggestions, so I might look into those too.

Buy Extra Paint

Unless you've painted a particular room a time or two before, chances are that you're guesstimating how much paint it will take. Well, this guesstimating left me having to do two extra trips to buy paint for our living room.

My advice is to think about how much paint you'll need and buy at least one extra can. You don't want to get down to the last wall you need to paint and be fully motivated to do so, only to realize you're out of paint.

Some stores will let you return or exchange unopened paint, so you can check on that if you're worried. Personally, I don't think it's a terrible idea to have extra paint lying around.

Before & After

Before and After Painting the Living Room
The lighting is horrible in the before picture, but you should be able to see what an ugly pea-green the room was! I know it looks very minimalistic right now, but I was trying to avoid shoving crap back into the room that I don't want in there long term.

Of course, much of that crap has now accumulated in the extra space in the dining room. Anyway, I'm super happy with how it turned out. It's so much brighter. I can't wait to get new curtains (and furniture and other stuff, but I'm getting ahead of myself there). So, it's not designer living, but it’s definitely an improvement!
That collage is  from The Coffee Shop Blog!

Love it? Pin it!

4 Things You Need to Know Before Painting

5 Printable Planner Pages—Arrowhead Themed Coral & Brown

Free Planner Printables

School is back in session or about to be for children and adults alike, which means the summer relaxation season is wearing off.  Before we know it, it’ll be the holidays and extra curricular activities will be in full swing.  Calendars will be full, if you’ve been fortunate to use one.

Related post: Dates to Remember Printable

If you’re still looking to put together a planner for the busy season of life—really, what season of life isn’t busy, though?—then here are five free planner printables just for my awesome readers!  This is a first for me, so let me know how you like them or if you find any mistakes!

Meal Planning Planner Printable

I’ve included a daily, weekly, and monthly planning page.  In addition to those two pages, there’s also budget and meal planning pages.  What other pages would you like to see in future free offerings?  What are your favorite planner pages?

Free Editable Planner Printables

These pages are completely editable, as well.  You can change many parts of them, and I highly encourage you to experiment and let me know how it goes.

Related post: Free Printable Baby Book Pages Part I

Soon, I’ll be adding lots of other options to my Etsy shop.   But don’t worry, freebies, sneak peaks, and discounts will all continue right here!

>> CLICK HERE TO ACCESS DOWNLOAD <<

What would you like to see for the next freebie?


Subscribe via E-mail


Follow Me

20 DIY Baby Shower Gifts

Now that finals are over and my kids are almost out for the summer, I'm wondering...

Am I the only person that has been invited to a million baby showers between February and July, not counting the women I know who are pregnant and not having a shower?

I guess part of that has to do with all the mothering-related groups that I'm a part of and the fact that everyone I knew in high school is currently in their twenties and having babies.


I don't mind.  I love baby showers!  I love babies (usually).

Really, though, most (if not all) of these DIY baby shower gift ideas totally trump most of the gifts I've ever given!  They're double cool because they're homemade and unique!

Nursing, Teething, & Babywearing Necklaces

1. T-Shirt Yarn Nursing Necklace from Wayfarer Homemaker

2. Crochet Nursing Necklace from Repeat Crafter Me

3. Silicone Nursing Necklace from Chaos Parade

4. Fabric Nursing Necklace from How Does She?

5. Make You Own Amber Teething Necklace from Make Sew Baby

6. Allspice Teething Necklace from Montana Solar Creations

Toys

7. DIY Stackable Rings for Baby from Domesticesq

8. B&W Baby Rattle from Lis Gillet

9. Activity Mat/Gym from Thoughts & Thimbles

10. Baby Butterfly Soft Toy from Sew Mama Sew

11. Pentagon Fabric Ball Tutorial from And Other Silly Things

12. How to Make Cloth Books from Cloth Books for Baby

Diaper Cakes & Related

13. Diaper Babies from Frugal Fanatic

14. Diaper Wreath from The Mandatory Mooch

15. Basic Diaper Cake (Easily Customized) from Susie Stamp A Lot

16. Diaper Bouquet from Frugal Fanatic

Miscellaneous

17. DIY Baby Bibs from Alice & Lois

18. DIY Burp Cloths from Sew She Sews

19. Baby K'Tan Carrier from Lobolita

20. DIY Pacifier Clips from Make It & Love It


Never miss a thing! Subscribe via email today!

4 Tips on Choosing an E-Commerce Platform

I recently guest posted over at Plucky's Second Though about 3 Super Easy E-Commerce platforms.  However, today I wanted to talk about how to choose the right e-commerce platform for you.  At this time, we're only talking about hosted platform and not ones you would have to host yourself (like WooCommerce or Magneto).
4 Tips on Choosing an E-Commerce Platform
I have used the Shopify platform, which I have linked below using my referral link.  If you click it and sign up for Shopify, I will earn a small commission.

Anyway, in an effort to find the perfect platform for me, these are the things I found to be most important.

1. Your budget.

Obviously, this can make a huge difference in what is available to you.  If you need low or zero start up costs, you'll want something like Etsy, Wix, or StoreEnvy.

This is probably the most important factor when deciding on what features you can and will have or what platform you use.  Regardless of what you want, if you can't afford it... Well, then you won't have it.

2. Layout and design.

E-commerce platforms like Etsy have a pretty fixed layout and design, with minimal customization by shop owners.  However, SquareSpace and Shopify offer a lot of options for templates and design (some paid and some free).  Big Cartel is another popular, customizable option.

3. Number of products

Depending on how many products you will or plan to have listed at one time, you might choose one e-commerce platform over another.  On platforms like Etsy, you pay a small fee per listing.  On platforms like Big Cartel or Shopify, a certain amount of listings are included in your plan.

Of course, it might also be a good idea to look at the maximum number of listings offered or where it tops out at on that platform.

4. Extra features

After you've got the basics down, you might want to consider what extra features you need now or that you might want later.  This is probably one of the biggest reasons people move away from platforms like Etsy and onto more versatile platforms like Shopify.

Based on my own research, I found Shopify to be the most versatile and affordable at the same time.  This is because Shopify offers and add on "store" but many features are free or very low cost.

On the other hand, if you're going to be using a lot of add on features, it might be more cost effective to have them included in your plan.

Add on features might include shopping cart recovery, loyalty rewards programs, subscription services, and more.

What e-commerce platform are you using?  Which is your favorite?  What one would you like to try!  Tell me in the comments below!
Never miss a thing! Subscribe via email today!

Printable Thank You Card

Here is a 3x8.5" printable thank you card or insert for your pleasure and use.

Printable Thank Yous

There's actually two. One is baby shower specific and the other is not.

Baby Shower Specific


General Thank You

Free Disney's Frozen Olaf Clipart

So, I think this gets me all caught up on the A to Z challenge. I'm super tired and tomorrow is Good Friday so I don't have to get up at 4AM for work. Yay! Here is my first attempt at some clipart. Of course, it's Olaf from Disney's Frozen. If you haven't seen it, I wrote a review not too long ago that might help you decide whether or not to give it a wing.

Just right click and save to use. No restrictions, but I do love hearing about your work or getting a link back. ;)

Free Printable 4x6 Invitations for Any Occasion

Today is letter I for the A to Z blogging challenge and, following yesterday's instructions on how to print invitations cheaply from home, I'm here to present two free printable invitations! These invitations could be used for almost any occasion. Simply print and fill in the blanks!

We have a very classy and elegant Umbrella Invitation and then a more fun, clean Whale Invitation. Again, both of these are 4x6. Enjoy!

Whale Invitation | Umbrella Invitation

How to Print Invitations & Cards Ridiculously Cheap

Well, these days are just trudging right along aren't they? Today is letter H in the A to Z Blogging Challenge and I'm going to tell you how to print invitations (or cards or whatever) for ridiculously cheap! I made my own baby shower invitations, which I'm sharing below, for dirt cheap!

Cheap Invitations & Cards

First, you go into your local Wal Mart. Then, you go to the office supplies section. Locate the index cards. Look carefully because you want unruled or blank (same thing, I think, just differently titled) index cards. Online, Wal Mart says they have colored options for about $2.25 per 100, but I didn't see these at my local Wal Mart. I purchased unruled, white 4x6 index cards. An 100 pack was less than $1.

So, for less than $1 I had 100 potential cards. Unfortunately, I don't have quite that many friends. Therefore, these are going to last me a bit. Anyway, I made my own 4x6 invitations in Microsoft Office 2007. Then, I adjusted my printer to my index cards and printed away. I only printed on one side, so I'm not sure how they would hold up to double sided printing. However, I think they turned out fabulous! I'll be sharing them printable later on in the A to Z series.

Easter Egg Ideas

So, it's getting late and I really didn't want to do E today for the A to Z blogging challenge. I wasn't feeling very motivated and I'm looking forward to my Sunday "off", actually. Unfortunately, I still have tons of other priorities to get to (like finish my speech for Tuesday...and practicing it).

Anyway, I figured (duh!) for E, I could just do Easter Eggs. I'm not sure why this didn't come to me sooner. I decided early on that we have too much going on this month and the next month, so we're not doing anything special for Easter. I'm not even sure we will decorate eggs. However, if you're decorating eggs this year for Easter or just because you feel like it...here's so crazy fun ideas for a twist on however you traditionally do it.

S A S Interiors Melted Crayon Easter Eggs
Creating Colorful Easter Eggs with Melted Crayons by SAS Interiors
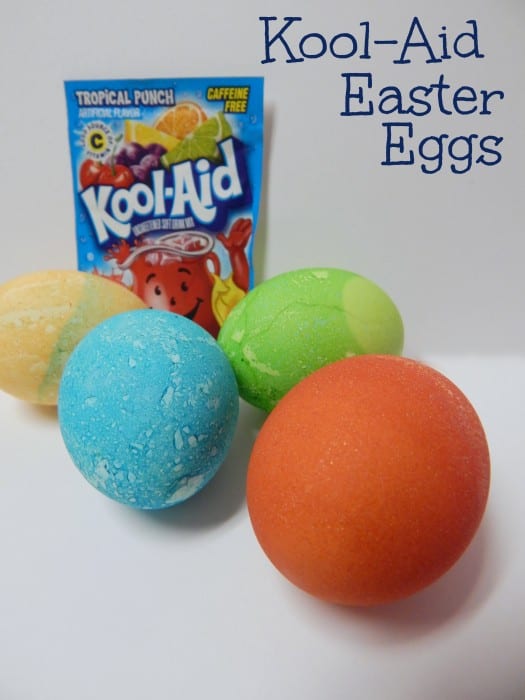
Koolaid Dyed Easter Eggs by Totally the Bomb
Koolaid Dyed Easter Eggs by Totally the Bomb
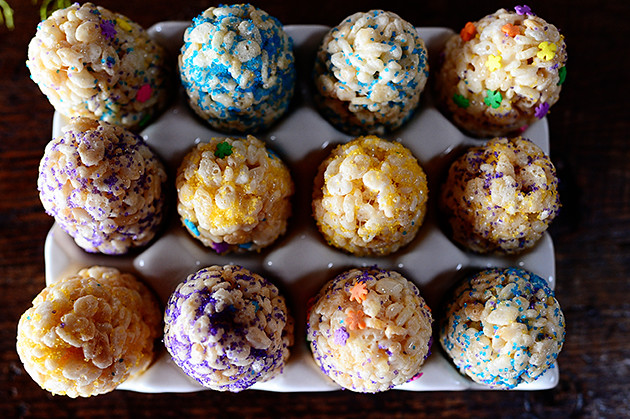
Rice Krispies Easter Eggs by The Pioneer Woman
Homeade Rice Krispies Easter Eggs by The Pioneer Woman
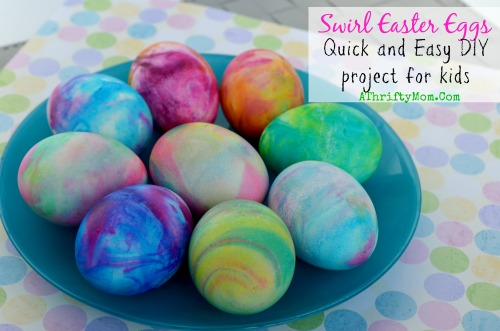
Decorating Easter Eggs with Shaving Cream
Decorating Easter Eggs with Shaving Cream by A Thrifty Mom
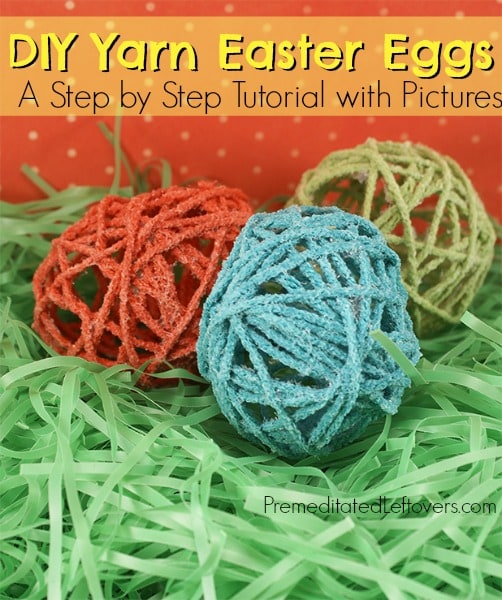
DIY Yarn Easter Eggs
DIY Yarn Easter Eggs from Premeditated Leftovers

What's your favorite thing to do for Easter? What sort of fun crafts do you have planned/.

DIY Triangles on Textured Walls

With the baby coming in 8 short weeks (EEK!) it's time to get moving with getting the boys' "new" room ready. I vowed to paint it before we moved them in. Lucky us, the playroom/their new bedroom was already white. Therefore, we didn't need to put a bazillion coats of primer on, like we did with the living room.

Note: Still apply one coat of primer in your primer color before completing any other steps. Whites never, ever seem to match each other.

Painting Textured Walls

This post is very image heavy, as I provide the painting steps in simple format via images first; then further explain below. If you haven't already, take a look at my tips for crisp, clean lines and designs on textured walls, that I posted earlier this week.

Painting Textured WallsPainting Textured WallsPainting Textured WallsPainting Textured WallsPainting Textured WallsPainting Textured Walls

Step 1: Tape

First, you need to tape off the wall edges and your trim. Then, you can start doing your triangles. It helps to have 2-4 lines that span the length or width of the wall to get you started. Then it's a lot like connect the dots (except it's lines).

I chose to do triangles instead of squares because me and the leveler are not the best of buds. It wasn’t necessarily faster for me to do the random geometric triangles than to do precise squares, but that’s probably due more to my inexperience than anything.  Depending on how many triangles you want, how big or small you want them, and the size of your wall; your time frame will vary. I worked on it off and on over a week.

Step 2: Caulk

After reading about how caulking tape on textured walls could solve the bleeding problem that I was dreading; I knew I had to try it. It works and it's worth the hassle. I say that because, if you're doing it alone, it can be quite tedious and time consuming; especially in this case where there's lots of lines.

My advice is to grab a partner and have them squirt along the lines, while you follow behind and smooth with your fingers. Apparently, paintable silicone caulk is best.

Optional Step 3 & 3.5: Prime & Tape for Duo Tone

For good measure (and because I didn't caulk all of the lines, because my husband convinced me I didn't need to...he was wrong), I went ahead and primed over the whole thing before getting into the actual painting. One coat should do.

Also, if you're doing more than one color of triangles (I did two), you'll want to tape the triangles of the second color off now, too.

Step 4 & 5: Paint

Using a paint roller with minimal paint (still being cautious of running paint, just in case) apply 2-3+ coats of paint, until you're satisfied. Allow to dry between each coat.

If painting more than one color, remove taped off triangles you want to differentiate from initial color and repeat step 4.

Step 6: Remove Tape

Remove all your tape and admire your handiwork! If needed, touch up with a foam brush. I had a few spots where the caulk came off with the tape.

If your walls are not textured, you could easily follow this tutorial, eliminating the caulking and probably the primer, too.

Love it? Pin It!

Paint-Triangles-Textured-Bedroom-Wal


Subscribe via E-mail

Follow Me

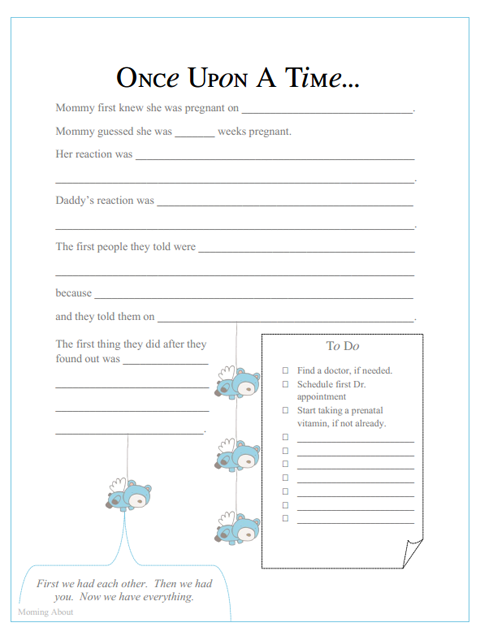
Printable Baby Book Pages Part II

Printable Baby Book Pages About

Now that I've shared my first pages for your printable baby book, here's the next three pages! These three pages include a First Things page (first kick, heard heartbeat, etc) and an about page for mom and dad.

Baby Book Pages: First Things & About Mom & Dad

All The Firsts Baby Book PreviewAbout Mom Baby Book Preview

Ready to Print .PDF Files

First Things & About Pages: Girl
First Things & About Pages: Boy

Editable .DOC Files

First Things & About Pages: Girl
First Things & About Pages: Boy

Free Baby Book Printables Part 1


I'm so excited to announce that I created these super cute baby book printables for free! All you have to do is go over to Plucky's Second Thought, where Plucky was kind enough to let me share them! Happy Valentine's Day!

Download & Print Here

Baby Book Pages BoyBaby Book Girl Pages

Homemade Fortune Cookies + Free Valentines Fortune Printable

I'm not sure when or where I discovered homemade fortune cookies on the internet. It was probably Pinterest. I have been meaning to make them for a while now, and Valentine's Day seemed perfect! I literally made these on Wednesday. What is with all you people making your Valentine's crafts in January?

I'm pretty sure my seven year-old will be the only child in class with fortune cookies, let alone homemade ones. Plus, me excluded, everyone at my house loves Chinese restaurants and fortune cookies! My husband said these were the best tasting fortune cookies ever! What wife doesn't feel totally accomplished and flattered when her husband says something like that?
Homemade Fortune Cookies

Homemade Fortune Cookies

Details

  • Prep Time: 5 minutes
  • Cook Time: 5 minutes per batch
  • Total Time: Varies

Ingredients

  • 1/4 cup flour
  • 1/4 cup white sugar
  • 1/8 tsp vanilla extract
  • 1 pinch salt
  • 1 large egg white
  • 1 Tbsp melted butter (optional)

Instructions

  1. Preheat oven to 400 degrees.
  2. Coat cookie sheet with butter/nonstick spray.
  3. Combine vanilla and egg white and stir until frothy.
  4. Add in flour, butter, salt, and sugar.
  5. Scoop out in teaspoon fulls. May take some practice to find the right size.
  6. Only cook 2-3 at a time, until you know for sure you can cook more.
  7. Bake for 5 minutes or until 1/4" of the rim is golden brown.
  8. Remove from oven and fold over fortune paper. If needed, drape over the side of a measuring cup to create the pinch.
  9. Place inside muffin cups to hold shape until cooled.

Free Valentine's Day Fortune Cookie Printable

Click image to go to dropbox download.
Free Valentines Day Fortune Cookie Printables